What to Bring to the Line
You should understand that when you approach the firing line or anytime you are moving back and forth from the firing line you should be wearing eye and hearing protection.
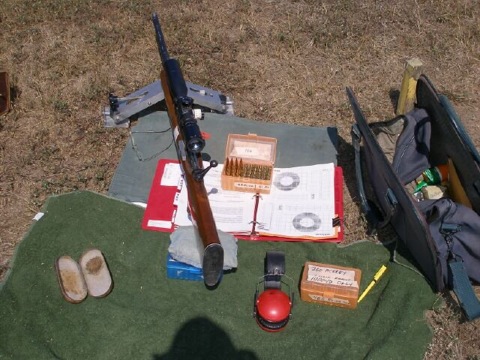
The picture on the right shows what you need to bring to the line. It’s one of the bipod rigs and you can see how this particular shooter lays out his gear. I’ll give him credit he got all the stuff he needs right there except for himself and the shadow indicates he’s close by. He also happens to be a good shooter. I think the open case on the left is his eyeglass case the protective kind and he’s probably wearing them. I would prefer a rear bag but what’s shown in the photo is exactly the type of creativity you’ll find amongst different shooters. With the hearing protectors on the mat this relay is just in the making.
The first thing you should bring onto the firing line is you’re shooting mat. You need to position it in such a fashion that it’s slightly angled right or left depending on which way you shoot your rifle, right-handed or left-handed. The placement of the mat is never perpendicular to the targets downrange. It is always set at a slight angle either right or left. If you’re shooting paired or 3 up you need to make allowances for the other shooters around your firing position. Are they left or right hand shooters? You need to know this to correctly position your mat. On our ranges from 100 yards right out to 1000 there are colour-coded pegs in the ground to help you line up your position with the target you’ll be firing at. For example the wooden pegs on the Mons ranges at Camp Borden are coloured from right to left as yellow, black, red, yellow black red etc. These correspond to the target numbering boards which are also done up in yellow, black, red. Do not pull these wooden pegs out of the ground, because they never seem to get replaced back in their proper positions! Just position yourself, your shooting mat, to the left or right of the peg. You can be quite close to them without disturbing them. If you shoot disciplines (precision & service rifle matches) where some may be shooting a semi-auto rifle position yourself according. If you are shooting a bolt action rifle try to work out a position arrangement where you are out of the path of the flying brass that will be ejected from these rifles. Usually semi-autos eject brass from right side of the action and the brass flies away from the shooter on the right side. It may fly forward, horizontally or slightly back. You won’t know till they’ve fired a few rounds and that’s not the time to be finding out about this! You’ll have to rebuild your position. If you position yourself to the left of a semi auto you should be fine.
After the mat is positioned the next thing that you should move into place is your rest if you’re using one. The rest has to be positioned in such a fashion that you have enough elevation to reach your respective target. Each berm is different in height and slope of angle so the rests’ position will vary as you move forward or backward to the different yardages. Sometimes you find that you are slightly over the edge of the berm and sometimes you’ll be further back. Under no circumstances should your body be ahead of any muzzle pointing downrange. This is common sense, safety is always the first concern of anyone on the range and you should not be putting yourself or anyone else at risk at anytime while on the range. If you position yourself too far forward, but still back from the muzzles you’ll receive more effects from the surrounding muzzle blasts around your position.
Once you’ve roughed in your rest you’ll need your rifle and rear bag for final adjustment. Just make sure the range flags have gone red from green before bringing your rifle to the firing line and that the command for bringing rifles to the line has been given. In my setup my rifle is the last thing I bring to the line and it’s the first thing I remove from the line after my chamber has been check by the RSO and I’ve inserted my chamber flag.
Before any live firing takes place on any range the RSO (Range Safety Office) will gather everyone together and explain exactly what’s go to happen and when. You need to pay attention to what the RSO have to say even though you may have heard the information many times before. There is always the possibility of last minute changes to the program so pay attention to what’s being said. If you don’t understand anything ask questions at the end of the talk so you are crystal clear on the proceedings. No one will fault you for asking questions at this time. Where you run into problems is not-knowing what you should be doing when the command has been given to commence firing!
You can not bring a rifle to the firing line until the command to do such has been given and on our ranges not before the range flags have gone from green to red. The only exception to this rule is where competitors on the second string are allowed to move their equipment to the line after the first string shooters have vacated their positions. You will not know if this is in effect if you didn’t pay attention during the preparation talk. The DCRA website has all of the current rules listed and you should download or review a copy from there and pay particular attention to reading the Safety Rules under section 16.02 Safety.
So reiterating now we have our mat positioned on the berm on the firing line and the shooting rest is in place. The next thing would be a rear bag if you’re using one place it on the mat behind the rest. If you’re using a spotting scope you’ll place that either to the right or left of the rest. You’ll want your score card handy and I’ll briefly talk about them in a minute. If you will be plotting your shots you’ll want to have your clipboard or binder and writing instruments on the line with you.
Some folks have small rubber mallets to tap the three points of their rest in the ground or to tap the earth a bit so their rests don’t wobble. You can’t rearrange the surface of the berm on the firing point beyond a raised lump of dirt. The last thing I like to bring to the line is my ammunition and finally the rifle when the command to do so has been given.
Once you are allowed to bring your rifle to the line you can then properly position it in the rest and on the rear bag and make any elevation adjustments specific to the yardage you’re shooting at. This is commonly referred to as prep time and the length of prep time does vary. It’s usually between 3 to 5 minutes. You can move your ammunition into a comfortable position so that you can reach it easily. You can adjust your scope by setting such things as magnification, parallax, elevation and windage. You can check the final position of your spotting scope.
What you can’t do is put a round in the chamber. That can only be done when the RSO gives the command to commence firing!
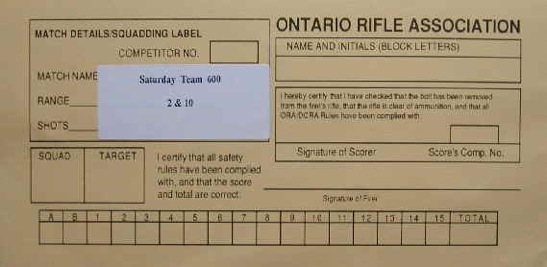
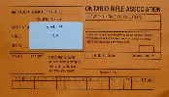
In competition you will have a colour coded score card. Make sure you have the right one with you on your firing point for the shooting distance you will be firing at. Depending on whether you are single stringing, shooting in pairs or shooting 3 up you will pass your score card to the person on your right. You always pass your card to the person on your right. If you are the right most person on the firing point you will hand your card to the furthest person on your left. Before you do this make sure your competitor number, name, squad and target number is clearly and legibly marked on the card. In addition to your name which you will print in BLOCK LETTERS on the top right side of the card, there are two signature areas below your name on the Ontario Rifle Association score cards as shown in the photo. The ORA and DCRA employ cards of different colours. The cards are generally orange, pink, blue, light yellow but they can be any colour for any yardage. You need to be using the right card at the right yardage. There are two signatures required on each card before they become official. The first signature area is the Signature of the Scorer and their competitor number. When you sign this area of any card make sure you understand what you are signing for. The text reads… I hereby certify that I have checked that the bolt has been removed from the firer’s rifle, that the rifle is clear of ammunition and that all ORA/DCRA Rules have been complied with.
The next signature is the Signature of the Firer. The text reads… I certify that all safety rules have been complied with, and that the score and total are correct.
Do not sign in either area until you have fully complied with what the text is saying!
You don’t sign the card first and then comply with what you just signed for! If you do this you are in violation of the rules and the penalties are severe and rightly so!
When you finish firing your record shots either pull your bolt immediately and/or insert your chamber flag! If you do this every time you’ll will never put yourself in a position to violate the rules. I can not stress this enough. Your signature on these card means compliance period. There is absolutely no other way to interpret it.
Once this is done the first thing you remove off the line is your rifle. Get it back behind the firing line before you removed anything else off the firing position. Then in a timely and orderly fashion removed the rest of your gear. Someone else may be waiting for your position. Don’t dally around or unduly delay the process of equipment removal from the firing line.